Showing posts with label Sugar Motor. Show all posts

Tuesday, November 9, 2010

Moonburner Motors Get Bent


First time I've tried to upload a vid clip.
Hope it works OK.


When I first started experimenting with making my own sugar motors, I made several decisions under their own merits which eventually lead to an epiphany. When combined, these factors
created an interesting moonburn synergy.

First, I chose to use 15/16" diameter [24mm] phenolic cases that are thicker walled, than Aerotech, being 3/4"id instead of 7/8"id. To simplify the nozzle issue, I elected to buy Aerotech nozzles instead of producing my own from scratch, though this requires that I turn down the nozzle OD to fit my cases. Like most other experimental motor makers, I still wanted to maximize the propellant fraction. I decided to pour directly in the cases, including the convergent frustrum. No casting tubes or liners required. After only a couple false steps, I tried silicone tubing as my core spindles, which works great when casting sugar propellant. The silicone spindles are longer than the motor case, and extend all the way from the nozzle to beyond the top end. A rod or dowel, as the case may be, the same diameter as the nozzle throat, but loose inside the silicone, extends through, acting as an alignment guide and throat plug. After curing, the rod is drawn out, then with a steady tug, the silicone stretches, losing contact with the core wall, and pops right out pretty as you please.

Though I started with core burners, a major goal all along
was to make moonburners since I couldn't buy any commercial ones for a long time, and then when I could, only in 'J' and above.
With the old Aerotech D-G moonburners, the fuel was precast
and had a drilled port to one side that you would have to blindly hunt for with a piece of 'S' bent Thermalite. Even for
someone experienced with these motors, it was tough to
install, tough on the Thermalite and chuffed too often at the best of times.
Epiphany; My flexible silicone spindles need not be straight.
I attached the silicone tubing to the nozzle throat with a short plug, then 'S' turned the tubing over to the case wall where
it's held in place with a suitably fashioned wire clip.
This creates a smooth pathway for the ignitor during installation AND expulsion, even when using Copperheads. This 'S' turn also creates a short area of coreburn configuration near the nozzle, producing a higher takeoff spike before it settles into full moonburn mode. Perfect for a medium size 'D'-'E' bird.

Another goal of making motors was that my wife [now ex] and
I had always been into clustering, especially air-starts. Estes 'D's are great for this but keep costing more and more.
I was already enamored with the idea of focused thrust [long before Flis-Kits] and wanted a way to add that feature to already existing rockets with air-start clusters. The curvy silicone core spindles work even better with the angled nozzles. Now there's only one shallow bend instead of an 'S' curve. This also reduces the coreburn section, making the motor more of a true moonburner. Since classic moons ramp up and down more gently than other motors, they are less prone to affecting the flightpath if multiple ignitions are uneven, or lacking. Focused thrust, of course, further reduces possible flightpath disturbances. I made a 10 degree angled nozzle holder for my lathe, so that I could modify the Aerotech nozzles before gluing them into the cases.


Angled lathe tooling with unmodified nozzle
installed, and a used angle nozzle motor.

Monday, October 25, 2010

Campitch 2


Pics by: KeithAlanK

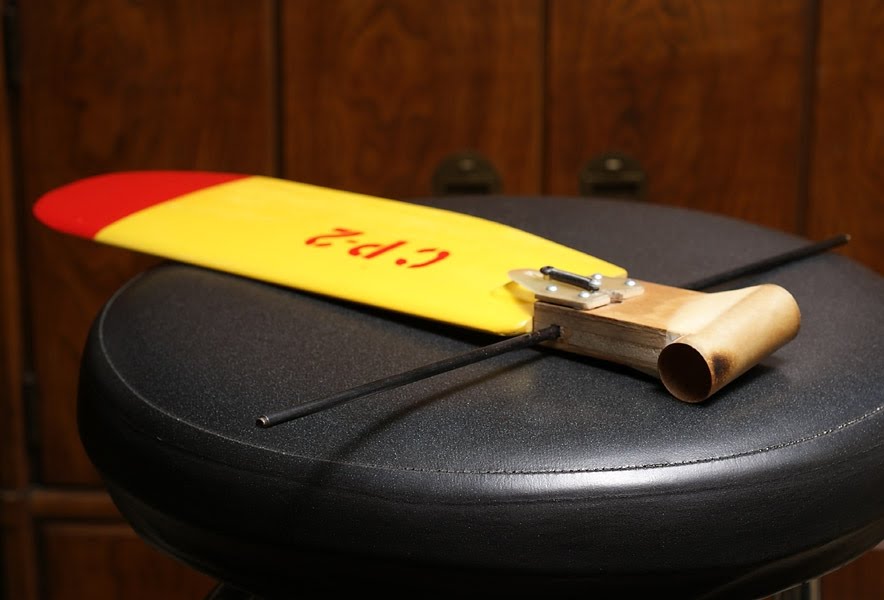
This is the new improved Campitch 2.
It has the same features as the defunk Campitch 1 but is larger and beefier. Most notable is that the wing is much larger, by nearly 50%. The span is 2" longer, but the wing is made from
1/4" x 4" Sig airfoil stock instead of 3/16" x 3" stock. The thicker wing allows for a thicker 3/16" carbon pivot rod instead of the 1/8" carbon, then steel pivot rod on the CP-1. The hub assembly is about 1/2" longer on the motor side.

The CP-2 is already leading a better, or at least charmed, life than the CP-1 did. It has made three flights so far with nothing worse than some burn through charring [routine] and a ding on the wing tip.

The first flight back in August had us rolling on the ground, and we weren't even on fire! I launched the CP-2 on an Estes D12-3, it took off from a 2x4 pad low on the ground and ascended to no more than 3ft as it travelled 5-6ft upwind, then curved left going just over a modroc launch rack passing through a gap in the launch rods with scant centimeters to spare, then it drifted back downwind to land right next to it's takeoff point. It looked a lot like an olympic highjumper in action.

Todd, one of my flying buddies said he'd buy me lunch if I would fly it again. I didn't have any more suitable motors for it, so I told him I would if he could donate an Estes E9. For various reasons, I had yet to use any E9's before, so this one was my 1st. Well that turned in a perfect flight, 60-70ft up, transitioning to full autorotation mode about 1/2 way down and landing about 100ft downwind.

September launch dates were all rained out, so I had to wait till October for flight #3. Since the CP-2 flew so well on an E9 I figured it could handle one of my long sugar moonburners. These are sized the same as the E9 though heavier start to finish and has a higher sustain burn and longer duration. Well this spinny thang tookoff and immediately tilted about 45 degrees downwind for about 100ft then curved back and up in a boomerang turn till it was knife edged, pointing into the wind, at which point it ran out of sugar and dropped straight into the ground. Amazingly, the only damage was a little mushing of the wingtip, easily fixed by supergluing my fingertips to it.
The only other time I ever saw a monocopter with quite that flight profile was when I actually launched one with no flybar installed at all. Obviously a flybar with more authority is needed.
Not too surprising really, since the flybar was the same one the smaller CP-1 used.

Friday, September 3, 2010

Campitch 1 Monocopter Pt 3


A good ascent. Note wing gap.

Takeoff. Sign of an inadequate flybar.
1 ft up and already 1 ft sideways.


The wreckage.

The Campitch 1 is no more.

It made 10 flight attempts in 10 months.
Four flights were considered OK, one was very good,
and only one was nearly perfect. One way or another
it tossed it's wing four times. It tore up one part  or
another of the cam system four times, and broke one
flybar. The final flight did all three at once.

Even the best flight bent the cam follower bolt.  It
was the ninth flight and I used one of my 24mm E  
sugar moonburners.  It ascended to around 60 feet, it's
highest flight, and when it coasted about halfway down
it finally slowed enough to retract the wing into full
autorotation mode.   D motors never gave it the needed
height to do this.

On the tenth flight, I used an Aerotech E11J. At about
the 40ft mark, still under power it disintegrated. The
flybar was broken and the cam follower bolt was half
torn from the wing root, and the bolthead was pulled
through the G10 fiberglass cam track.

This spinny thang taught me more than all my previous
monocopters put together.

The biggest problem the CP1 had was it's pretty wing.
Being fully glassed it was too heavy [especially with
balance weight added to the leading edge], and that
eliptical wingtip made it too slick. Together this
gave it a higher than average rpm AND a tendency to
not slow down anytime soon.
Again, because of the wing weight, the unweighted
3/16" flybar used on the first five flights lacked authority.
This caused the motor and wing to pick their own pitch
angle and for the monocopter as a whole to squirrel
around and track at odd angles instead of going straight
up. The second flybar was 1/4" diameter and slightly
longer, but it had so much drag  altitude was reduced
by half.
The wing retract spring is always an issue. If it's too
heavy; it takes extra rpm to extend for takeoff.
If it's too light; it has to slow more to retract into
auto rotation. I used springs because I had a pile to
pick from. A better solution would be rubberbands
which might be easier to fine tune.
Finally, 1/8" pultruded carbon tubing it totally
unsuitable for D+ powered monocopters.  I managed
to break them outright 4 times, in three different
applications.

I'll spare y'all the flight log.
Yahoo Monocopter Group won't be so lucky.


Friday, August 20, 2010

Sugar Motor Testing Pt.2, Getting Sweeter

t
Art Applewhite's Cinco38 Prototype
Pizza Hut

My Tide Wave version with ISP
38-360 case for comparison

Tide Wave on 1st sugar flight.
Using Ultra-White recipe.

Tide Wave pouring on the sugar
and spinning hard.


A big update to the previous post.
Since that test took place back in February I've burned 3 more sugar reloads in the test series. Since the test stand is still broken [the new guage I want for it aint cheap], I went ahead
and flew them in an Art Applewhite 38mm Cinco Saucer clone, my Tide Wave, or in Art's prototype Pizza Hut Cinco38.
Since it's 1st flight I've trimmed down the wavy edges twice on the Tide Wave. The spin under power was fine by me, but the spinning causes recovery problems. I've also flown the Cincos on an Aerotech G64W reload and an ancient and suspicious single-use Aerotech 320Nt H145 manufactured in 1988. These 2 motors definitely bracket the sugars below in the medium H category.

The motor that blew the stand had Bi-modal KNO3 [an inspecific mix of powdered and granular], my usual opacifier
1% Lamp Black, plus 1% Red Iron Oxide. A very fast recipe.
The next 2 are the same as above but with 8% Titanium shavings added for sparks. One had fine sparks, the other coarser sparks. The mildest recipe, nicknamed Ultra-White, uses granular KNO3 and 1% Titanium Oxide as a white opacifier. The only test recipe not burned yet is Ultra-Pink. Same as Ultra-White above but with the addition of 1% RIO on top of the TiO2.

So far, except for the wrong nozzle incident, everything has worked well. Ignition with my now standard Copper Thermite ignitors has been a non-issue. The RIO sure is messy stuff but it
really does improve pouring viscosity, just as other sugar cookers have noted. I didn't doubt it, but wow, seeing it happen is amazing.

At this rate, I'll have to make more test loads by the time the test stand is repaired.
Aw shucks.

Tuesday, August 10, 2010

Sugar Motor Testing [not all sweet]


Ignitor hookup.
Black crescent at bottom of guage
window is probable damage.


Instant On! Ignitor wires inflight,
Guage needle is still on zero.


Burnout. Foreground smoke
came out of guage face


Expelling a bit of casting tube.


Blackened guage guts hanging out.


In order to evaluate possible changes to sugar motor recipes, I developed a new shorter motor that would be more economical to operate. It helps that I was given a damaged reload case [Thanks Ray!]. My long motors use two 6 1/8" fuel slugs, unfortunately the short motor, after repair, only fits 5 1/4" of fuel. An even 50% would've been nice, but this is close enough, and it was a free motor.

Late last year I made 4 pairs of reloads, all physically the same,
but each pair has a somewhat different formula. All are moonburners since they burn twice as long. Eventually some will go to a thrust stand, but IMO, chamber pressure tests are initially more important. It's good to know what even works before tieing up [or risking] a high dollar digital thrust stand.

I made a new nozzle with a 3/16" throat that would be used with some of the new grains, especially the baseline formula. Being virgin territory, none of these reload kits have the
nozzles listed on the labels like I do with the larger mature reloads. On Feb, 20 2010, the morning of the test, I picked the new 3/16" nozzle and installed it with reload #1 rather
than with reload the mildest. Reload #1 was a hotty and should've been tested first with a 1/4" or even 5/16" nozzle. The motor survived the test but barely. Probably only because it trashed the guage and was blowing out both ends. As it is, it severely belled the nozzle washer and crumbled the corners of the nozzle where it was pressed into said newly angled washer. Despite the short foliage and limited dipersal angle, we never did find the polycarbonate guage window. There is evidence that the pressure guage was damaged previous to this test attempt.

The hydraulic test stand has been cleaned and is getting rebuilt. Besides the new & better guage, it's getting a grease fitting and a brake bleeder valve. Instead of filling the stand with brake fluid as before, I'm going to use grease. This will allow for easier transport of the stand and with a good grease gun I should be able to use the stand to pressure test motor case materials and other components.


Sunday, September 27, 2009

Campitch 1 Monocopter Pt1


This is the Campitch 1.  The 1st of 2 recently finished
monocopters. Both monos employ quite different wing
control mechanisms, but I decided to build both at once
because most of the construction is routine enough to be
a bit boring and I always mix too much epoxy  anyway.  

The Campitch 1 uses a system similar to that of the
Rotary Space Ship that I posted about back in March of
this year. When the vehicle begins to rotate, centrifigal
force causes the wing to slide outward on its' pivot rod,
as it does so, a pin on top of the wing root follows a
cam track causing the wing to rotate from down pitch to
up so that it can ascend.  Once the motor burns out, the
mono will slow it's spin until a spring can retract the
wing, returning it to down pitch so that it can autorotate
for a gentle landing.   No stopping, no falling.  

Now, I've done away with the burn string that the
Mousetrap requires.  After I work the bugs out on D12's,
I'll be able to fly it on my own small moonburn sugar motors.

Sunday, September 13, 2009

Flying a better Mousetrap


I've been flying monocopters since 1988. I've also seen
other people fly them. They all shared two common
problems, the first is getting them to stay in one piece
throughout the flight despite the high rotational loads.
I've seen a few fly apart, including some of my own.
Anyone who hangs in there a while, can conquer this
sooner or later.
The second problem is the subject of this post. When
a monocopter's motor shuts off, they typically stop
spinning and fall down. Some falling monocopters will
reaquire spin, either backward or upside down, hopefully
before impact,and make a safe landing.

In short, after getting monocopters to go up reliably, the
next trick is to get them to come back back down safely.
I've seen other recovery methods tried with varied success,
but the coolest will always be autorotation, ie; true 
mapleseed recovery. Spinning up, and spinning back down,
without stopping, without falling.

Last fall, I built the 1st step on this quest. I call, it the Flying
Mousetrap. It somewhat looks the part. Mousetrap has a
wing that pivots around the center of lift. There's a spring that
pulls the wing to descent angle, and a length of string to hold
the wing at ascent angle until the motor [D12-3] ejection burns
it through. This gives a timely transition after slowing to
autorotaion speed, but without falling or reversal. The string is
actually dental floss, it's easy to work with at the field, and it
comes in a neat dispenser WITH a built-in cutter.
Minty fresh too.

I don't consider this to be the best approach to the problem.
It's a simple up/down system instead of being reactive, and it
limits the choice of usable motors to ones with suitable delay
and an ejection charge.  Since I make my own sugar motors,
I would prefer a system that can use them, and they're all
capped.  However, I figured this would be a good first step
that others might prefer.

The 1st flight video was posted by friend John Lee at the time.
http://www.flickr.com/photos/23694991@N03/2953720670/


Wednesday, July 22, 2009

Such a great idea...


Such a great idea, yet even Estes doesn't seem to
want to build one. WTF?
In the 1997 Estes catalog there was a kit that never
reached production. It was a model of a fly-back booster
called Star Booster. It's based on descriptions in Buzz
Aldrin's sci-fi book; Encounter with Tiber. copyright 1996
Great book by the way. I dug it up for this post and then
read it all again.

In the book, the Star Booster is built by Boeing to take
a slide-in Zenit motor/tank assembly, built under license,
in the USA. One or two of them would be attached to a
core vehicle as a strap-on like an SRB is. After using up
it's propellants, the Star Booster would seperate from the
core vehicle then glides back to an automated runway
landing near the launch site. After each flight, the Zenit
is removed for seperate servicing. When the airframe is
ready, the next available Zenit gets installed for a quick
turn-around.
BTW; Boeing really is building licensed Zenits for the
Sea Launch commercial launch program.

The Estes Star Booster model was going to be 18" long,
with a 9.5" wingspan, parachute recovery, C motors only.
By the looks, I expected it to have a cast styrofoam
fuselage over a cardboard core tube, just like the large
Shuttle Orbiter kit of the same time period.

I've been looking at the Estes Star Booster recently  with
ideas for reproducing it. I have hot-wire foam cutting
equipment, so it's not a big stretch for me to model it at
the original size or larger.  The difficult part is that not
only do I want it to glide, I want it to glide with an unfair
chunk of reload casing inside it. In short, a realistic mission
as afly-back strap-on,  boosting a level 2 size rocket.  For
the sake of balance it needs a long thin motor case.  Either
a 29/360 or 38/480+ sized case, probably EX  and burning
sugar. The big trade-off [ya can't design anything without
trade-offs] is, to maintain balance, the bigger the  model,
the longer the motor case needs to be, and  vice-versa.   
Of course, it'll glide like a brick!

For more info see;  Fly-Back Boosters, Reprised
right here at ZZakk's Lab on Monday, May 18, 2009
These 2  posts [of 3 before long] were supposed to coincide
more closely, but I'm easily distracted.


Tuesday, March 3, 2009

Sugar Motor Data II


Today, we're looking at the data for the second
motor tested last month. This one is 538-M2.
The M in the designation stands for Moonburn.
In the lower illustration, you can see that the 
motors core is offset to one side, instead of in
the center.  As the motor burns, consuming
the propellant, the remaining propellant looks
like a waning crescent moon.
I about fell in love with moonburners back in the
'80's, when there were a number of them available
to choose from. Later they all but disappeared
from the market. This was a major prod for me to
start making my own motors.  BTW; Publishing
these motor graphs was the final prod to start this
blog. By nature, a classic moonburner is typically
slow to reach maximum thrust, so I wasn't going to
fly this motor design until I saw a thrust graph.
I intend to test a couple more to be sure, but in my
motor, the thrust does rise quickly, so it looks like
I have a great sport motor here. I'll fly them as such
soon, but I was originally trying to make a clustered
airstart motor. I still want a somewhat slower thrust
ramp up, to avoid disturbing the rocket's trajectory 
if the motors in the cluster lights unevenly.

Saturday, February 28, 2009

Sugar Motor Data


  This is the test data for the motor used in
the RU-486, discussed in the previous post.
I thought about posting a pic of the actual
motor, but to a non-rocketeer, it looks like
a boring aluminum tube. To a rocketeer it
looks like an aluminum rocket motor that's
boring because it's not lit.
  I've been into making sugar motors for
about 8 years now on an unsteady basis. I
started developing this Bates grain motor
right after my initial successes with small
disposable motors. Initial ground tests of
all motors were done with a peak reading
pressure guage in order to dial in the correct
nozzle size. I flew the 4th and 6th motors,
the 6th being the RU-486 flight. This is the
first time I've gotten to test these motors
on a proper motor test stand, unfortunately,
the pressure transducer had a broken wire,
so there is no chamber pressure graph.
  We believe that the strain guage was not
properly calibrated and the unexpectedly high
ISP number bears this out. There is no doubt
though, this is an extreme motor.
  I recently adjusted my motor labelling
nomenclature. 638-B7 means, Cooking batch
#6 for any 38mm motors, B for Bates geometry,
7th bates motor produced. Labels packed with
the reloads hold additional data, but this is
enough to I.D. the motor when referring back
to my notes.

Thursday, February 26, 2009

Sweet Flight, Sudden Ending!


This is the 2nd, and last, flight of the RU-486.
Yes, I named it after the "Morning After Pill".
Just the thing for a Saturday or Sunday morning.
The 1st flight the day before was on an Aerotek
I161 motor, this flight is on an experimental I947
motor burning Sorbitol diet sugar and Potassium
Nitrate.
The launch was on 7/8/07 deep in the heart of
Pecos County, Texas. Courtesy of WestTex Tripoli.
The photographer was lucky to catch it, it was
already hauling ass. In fact, the acceleration
was so high that the control altimeter shifted
backwards causing the contact pins to pull out of
the connector body on the wireing harness. Pulling
one contact with pliers is tough, pulling all 4 at
once is impressive. Of course, with the altimeter
disconnected, the rocket ended up in a hole. A
deep one. I had to borrow a shovel.
Basic Specs: 5ft tall, 2 1/4"dia., ACME Fincan,
38mm motormount, Adept ALT-S2 altimeter,
rigged for single chute recovery.
I gave it a lot of thought before posting an
unsuccesful flight as the first rocket pic on here,
but it's important to remember that one usually
learns more from failure than success. This is a
great pic anyway, and it makes a flashy intro to
my sugar motor research which will be expanded
upon in the next couple posts.